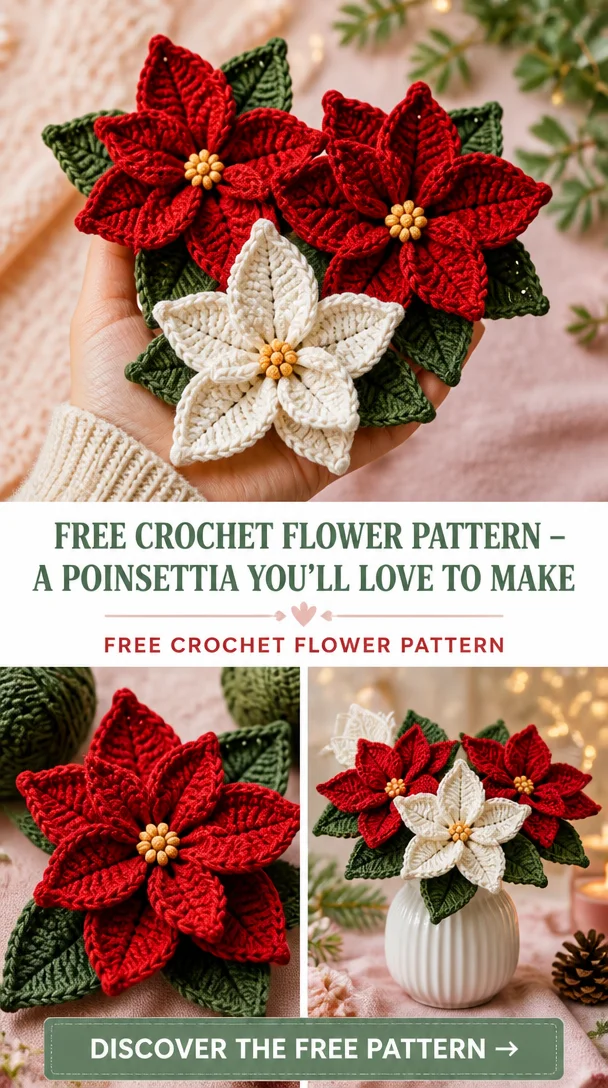
Crochet Poinsettia Flowers – Christmas Decoration Pattern — Free Crochet Pattern | amigurumi
Bring the spirit of the holidays into your home with these exquisite crochet poinsettia flowers! This beautiful pattern allows you to create stunning 3D poinsettias that make perfect decorations for your seasonal displays. The vibrant colors and intricate petal designs capture the essence of this classic winter flower, making them an ideal choice for DIY floral arrangements, holiday wreaths, or gifts for loved ones. Whether you’re a seasoned crocheter or a beginner looking to enhance your skills, this pattern is accessible to all levels. Add a touch of handmade charm to your festive decor with these lovely crochet poinsettia flowers!
Crochet Flower Pattern Overview
- Skill Level: Easy
- Finished Flower Size: Approximately 5-6 inches in diameter
- Crochet Hook Size: 4.0 mm (G/6)
- Yarn Type: Worsted weight acrylic yarn
- Yarn Weight: Medium (Category 4)
- Main Colors: Red, green, and yellow (or colors of your choice)
- Petal Construction: Worked in rounds
- Flower Center Construction: Made separately
- Stems and Leaves: Optional (guide provided)
- Construction Method: Crocheted in separate pieces and assembled
- Approximate Completion Time: 2-3 hours
- Beginner-Friendly: Yes, suitable for beginners and experienced crocheters
- Working Method: Petals are worked in rounds
Materials You’ll Need
- Worsted weight acrylic yarn in red, green, and yellow
- 4.0 mm (G/6) crochet hook
- Yarn needle
- Scissors
- Floral wire (optional for stems)
- Green floral tape (optional for stems)
- Glue (for securing flower centers, if needed)
Crochet Abbreviations
- MR = magic ring
- ch = chain
- sc = single crochet
- hdc = half double crochet
- dc = double crochet
- sl st = slip stitch
- inc = increase
- st = stitch
- sp = space
- rep = repeat
Before You Start
Before diving into your crochet poinsettia pattern, consider the following tips:
- Familiarize Yourself with the Pattern: Read through the entire pattern first to understand the flow and construction.
- Practice Working in Rounds: Ensure you are comfortable working in rounds, as this is essential for creating the petals.
- Maintain Tension: Keep an even tension throughout your stitches for a polished look.
- Color Planning: Choose your colors for petals and the center before starting; feel free to experiment with different color combinations!
- Petal Assembly: Each petal is made separately and then attached, allowing for flexibility in positioning.
Free Crochet Flower Pattern
Flower Center
- Make a Magic Ring:
- Round 1: Make 6 sc in the ring. Pull tight to close. (6)
- Round 2: Inc in each st around. (12)
- Round 3: sc in next st, inc in next st repeat around. (18)
- Fasten off and leave a long tail for sewing later.
First Petal Round
- Begin Petal Construction:
- Using red yarn, make a magic ring.
- Round 1: Ch 2 (counts as first dc), make 2 dc in the ring. Chain 2, then close with a sl st. Repeat for a total of 5 petals.
- Round 2: Ch 2, 2 dc in next sp, repeat around.
- Fasten off and weave in ends.
Additional Petal Rounds
- Create Detail on the Petals:
- Attach a new color if desired or continue with red for an additional round of detail.
- Round 3: Work dc in each st for the length of each petal, adjusting for desired height.
- Fasten off and cut yarn.
Assembling the Flower
- Joining Petals:
- Arrange the petals around the flower center.
- Use the long tail from the center to stitch each petal to the center securely.
- Make sure to spread them evenly for a full look.
Finishing Details
- Secure all yarn ends neatly.
- Shape petals gently by hand to enhance the overall appearance.
Flower Construction and Assembly
- Position the attached petals evenly around the center.
- Using the yarn needle and tail from the flower center, securely stitch the petals into place.
- If creating leaves, use green yarn to crochet and attach them as desired.
- Optionally, you may attach floral wire to create stems, securing the ends with green floral tape.
Petal Shaping and Finishing Details
- To shape petals, you may adjust height by gently blocking them with steam or shaping them with your fingers.
- Secure any loose yarn ends meticulously.
- Place leaves underneath the petals for a fuller effect.
How to Use Your Crochet Flowers
These crochet poinsettia flowers can be used in various ways:
- Form a stunning handmade bouquet for your holiday table.
- Add them to wreaths for a festive touch.
- Use as embellishments on gift wrapping or holiday cards.
- Create a centerpiece to brighten up your holiday gatherings.
Tips for a Better Result
- Maintain even tension throughout the petals for uniformity.
- Easy transitions between rows will ensure symmetry in your flowers.
- Attach leaves using a slip stitch for a seamless appearance.
- Adjust colors to match your home decor or seasonal themes.
Crochet Flower Customization Ideas
- Change yarn colors to match your decor scheme.
- Experiment with different yarn textures (e.g., soft cotton blends or shiny metallics).
- Try creating mini or larger versions of the flower by adjusting your hook size and yarn use.
- Add decorative elements like beads or sequins to the flower center for extra sparkle.
Common Problems and Troubleshooting
- Uneven Petals: Check your stitch counts and tension consistency throughout.
- Curling Petals: Block the petals gently to shape them appropriately.
- Loose Stitches: Tighten the yarn as you go to maintain overall structure.
- Difficulty Attaching Stems: Use a strong thread and secure with glue if necessary.
Care and Maintenance
For maintaining your crochet poinsettia flowers:
- Follow the yarn manufacturer’s cleaning instructions; most acrylic yarns can be spot cleaned.
- Check carefully for detachable parts; use minimal water and gentle treatment on delicate floral wire.
Frequently Asked Questions
Is this crochet flower pattern beginner-friendly?
Yes, it’s structured with clear instructions making it accessible for beginners.
What yarn is best for crochet flowers?
Worsted weight acrylic yarn is ideal, but feel free to experiment with different types.
How long does it take to crochet this flower?
The average time is about 2-3 hours, depending on your skill level.
Can I make the flower larger or smaller?
Yes, adjusting your hook size and yarn can modify the finished size.
How do I keep crochet petals in shape?
Blocking your petals gently with steam can help maintain their shape.
Can I use different yarn colors?
Absolutely! Mix and match colors to suit your style.
How do I attach a stem to a crochet flower?
A floral wire or a sturdy yarn tail can be sewn into the base of the flower.
Conclusion
Crocheting your own poinsettia flowers is a delightful way to usher in the holiday season. The beauty of this project lies in its versatility—these flowers can be gifted, displayed, or used in festive decorations. Engage your creative spirit and enjoy making these lovely crochet flowers that will surely brighten up your celebrations!
SEO Title: Free Crochet Poinsettia Flower Pattern for Holidays
Meta Description: Discover a free crochet pattern to create beautiful poinsettia flowers. Perfect for holiday decorations, DIY bouquets, and gifts!
URL Slug: crochet-poinsettia-flowers
Primary Keyword: Crochet Poinsettia Flowers
Secondary Keywords: free crochet flower pattern, crochet flowers, DIY crochet flowers
Image 1 Alt Text: Beautifully crocheted red poinsettia flower
Image 2 Alt Text: Close-up view of crochet flower arrangement in a holiday setting
Leave a Reply