Tag: crochet decor

  • Free Crochet Flower Pattern – Poinsettia Doily You’ll Love to Make

    Free Crochet Flower Pattern – Poinsettia Doily You’ll Love to Make

    Poinsettia Doily Free Crochet Patterns and Ideas

    Bring a festive touch to your holiday decorations with beautiful Poinsettia doilies crocheted by hand! These vibrant crochet flowers not only capture the essence of the season but also add a charming element to your home decor. The intricate design of a crocheted Poinsettia can transform any ordinary space into a festive wonderland, perfect for gifting or sprucing up your holiday tablescape. With this free crochet pattern, you can create unique floral appliques, standalone decorations, or even a stunning handmade bouquet. This project is suitable for crocheters of various skill levels, making it an enjoyable craft for everyone.

    Crochet Flower Pattern Overview

    • Skill Level: Easy to Intermediate
    • Finished Flower Size: Approximately 8 inches in diameter
    • Crochet Hook Size: 3.5mm (E)
    • Yarn Type: Medium weight acrylic or cotton yarn
    • Yarn Weight: Worsted (weight category 4)
    • Main Colors: Red, green, and yellow (for center detail)
    • Petal Construction: Layered petal rounds
    • Flower Center Construction: Worked separately
    • Included Elements: Can include stems and leaves if desired
    • Construction Method: Worked in rounds
    • Approximate Completion Time: 2-3 hours
    • Beginner-friendly: Suitable for beginners with basic crochet skills
    • Work Method: Mainly in rounds

    Materials You’ll Need

    • Yarn (in red, green and yellow)
    • 3.5mm (E) crochet hook
    • Yarn needle
    • Scissors
    • Stitch markers (optional)
    • Floral wire (if making stems)
    • Glue (for securing details)

    Crochet Abbreviations

    • MR = magic ring
    • ch = chain
    • sc = single crochet
    • hdc = half double crochet
    • dc = double crochet
    • sl st = slip stitch
    • inc = increase
    • dec = decrease
    • st = stitch

    Before You Start

    Before diving into the crochet pattern, ensure you have a clear understanding of how to make the magic ring, and practice maintaining consistent tension for an even finish. Familiarize yourself with the construction of the petals, which are created in rounds, and prepare your materials for easy access as you work through each stage. Plan your color pattern for the petals and center to achieve a beautiful visual effect.

    Free Crochet Flower Pattern

    Foundation or Magic Ring

    1. Create a magic ring.
    2. Chain 3 (counts as your first double crochet).

    Flower Center

    1. In the magic ring, make 11 dc.
    2. Pull the ring tight and sl st into the top of the initial ch-3 to close.

    First Petal Round

    1. Ch 3.
    2. In the same space, make 2 dc.
    3. *Skip 1 st, in the next st make 3 dc. Repeat from * two more times. Join.

    Additional Petal Rounds

    1. Repeat round 1 two more times, increasing the number of dc per petal as needed.
    2. To finish, sl st in the initial ch-3 space.

    Individual Petals

    1. For each petal, chain 3, 2 dc in the same space, make additional stitches as per the previous rounds until full.

    Shaping the Petals

    1. Use your fingers or a shaping tool to create gentle curves in the petals for a more natural look.

    Leaves

    1. For leaves, use green yarn and create a smaller magic ring. Follow a simple petal construction method similar to the flower.

    Stem

    1. If desired, use floral wire and wrap it in yarn, securing it with glue.

    Joining the Pieces

    1. Attach the center to the petals by sewing or gluing securely with yarn.

    Assembling the Flower

    1. Position flowers atop leaves and attach the stems for a complete look.

    Finishing Details

    1. Weave in all loose ends and ensure all pieces are securely attached.

    Flower Construction and Assembly

    Once you’ve constructed each component, begin the assembly by aligning the petals around the center and securely stitching or gluing them in place. Carefully attach any leaves and stems to complete your Poinsettia. Take your time to position everything evenly for a beautiful final arrangement.

    Petal Shaping and Finishing Details

    To enhance the appearance of your Poinsettia, gently bend the petals to create a natural shape. Ensure that each petal remains symmetrically positioned and secure any glues or knots before displaying or gifting.

    How to Use Your Crochet Flowers

    These lovely crocheted Poinsettias can serve multiple purposes, making them ideal for various uses:

    • Create a beautiful handmade bouquet for gifting
    • Use them as tabletop decorations during festivities
    • Incorporate them into hair accessories or bag decorations
    • Display them as part of seasonal home decor

    Tips for a Better Result

    • Maintain even tension throughout your project for uniform petals.
    • Carefully shape and layer petals to avoid unevenness.
    • Be mindful of your color changes for a harmonious final look.

    Crochet Flower Customization Ideas

    • Experiment with different yarn colors for unique presents.
    • Combine multiple shades of red and green to create depth.
    • Explore different textures of yarn for an appealing variation.

    Common Problems and Troubleshooting

    • Uneven petals: Check your stitch counts and tension.
    • Curling petals: Gently reshape them following assembly.
    • Loose stitches: Make sure to secure your ends firmly.

    Care and Maintenance

    Handling and cleaning your crochet flowers can vary based on the yarn used. Always check the manufacturer’s care instructions for washing and drying. Be gentle with delicate petals, especially if adorned with additional decorative elements.

    Frequently Asked Questions

    • Is this crochet flower pattern beginner-friendly?
      Yes, while some experience is preferred, beginners will find it manageable.

    • What yarn is best for crochet flowers?
      Medium weight acrylic or cotton yarn works beautifully.

    • How long does it take to crochet this flower?
      Approximately 2-3 hours.

    • Can I make the flower larger or smaller?
      Adjust the yarn weight or hook size for a different flower size.

    • How do I keep crochet petals in shape?
      Gently shape them after assembly and avoid over-stretching.

    • Can I use different yarn colors?
      Absolutely! Color variety adds a personal touch.

    • How do I attach a stem to a crochet flower?
      Securely sew or glue the stem to the base of the flower.

    Conclusion

    Crocheting your own Poinsettia doilies is a delightful way to enrich your holiday decor while enjoying a fulfilling crafting experience. The intricate details and vibrant colors make these flowers a fantastic addition to your seasonal festivities. Grab your yarn and hook, and let your creativity blossom!


    SEO Title: Poinsettia Doily Free Crochet Pattern for Festive Decor
    Meta Description: Brighten your holiday decor with this free Poinsettia doily crochet pattern. Perfect for gifts, decor, or festive bouquets!
    URL Slug: poinsettia-doily-crochet-pattern
    Primary Keyword: Poinsettia Doily Free Crochet Patterns
    Secondary Keywords: free crochet flower pattern, easy crochet flower, crochet floral decoration, handmade crochet flowers
    Image 1 Alt Text: Crocheted Poinsettia doily in festive colors
    Image 2 Alt Text: Close-up of crochet flower petals and center

  • Crochet Poinsettia Flower To Make For Decor

    Crochet Poinsettia Flower To Make For Decor

    Crochet Poinsettia Flower To Make For Decor

    Crocheting a poinsettia flower is a delightful project that adds warmth and charm to your holiday decorations. These beautiful crochet poinsettias look adorable anywhere in your home, but they truly shine during the year-end holidays. With their vibrant colors and intricate design, crocheted poinsettias can provide a magical touch to your festive atmosphere. Whether you’re looking to adorn your table, create a handmade bouquet, or craft unique floral appliques, this pattern is perfect for anyone interested in crochet—regardless of skill level.

    Crochet Flower Pattern Overview

    • Skill Level: Intermediate
    • Finished Flower Size: Approximately 6 inches wide
    • Crochet Hook Size: G (4.0 mm)
    • Yarn Type: Acrylic or cotton yarn
    • Yarn Weight: Worsted weight (#4)
    • Main Colors: Red and green (traditional holiday colors)
    • Petal Construction: Worked in rounds with layered petals
    • Flower Center Construction: Standard crochet center
    • Construction Method: Rounds and separate petals
    • Approximate Completion Time: 2-3 hours
    • Beginner-Friendly: Somewhat challenging for beginners
    • Worked In: Rounds and separate pieces

    Materials You’ll Need

    • Worsted weight acrylic or cotton yarn (red, green, and yellow)
    • G (4.0 mm) crochet hook
    • Yarn needle
    • Scissors
    • Stitch markers
    • Floral wire (optional, if adding a stem)
    • Floral tape (optional, for stem finishing)

    Crochet Abbreviations

    • MR = magic ring
    • ch = chain
    • sc = single crochet
    • hdc = half double crochet
    • dc = double crochet
    • sl st = slip stitch
    • inc = increase
    • st = stitch
    • sp = space
    • rep = repeat

    Before You Start

    Before beginning your crochet poinsettia, it’s important to understand the basic shapes involved in creating the petals and center. The pattern is primarily worked in rounds, with each petal formed separately to achieve a layered effect that adds depth to your flower. Ensure you maintain even tension throughout the project to prevent the petals from curling. It’s a good idea to pin each petal down while you work on the others to keep everything aligned.

    Free Crochet Flower Pattern

    Foundation or Magic Ring

    1. Start with a magic ring.

    Flower Center

    1. Round 1: In the magic ring, ch 3, then work 11 dc. Tighten the ring and sl st to the top of ch 3 to close.

    First Petal Round

    1. Round 2: Ch 3, work 3 dc in the same stitch. Repeat around the circle for a total of 12 petals (4 petals between each set of 3).

    Additional Petal Rounds

    1. Round 3: Repeat with additional yarn color for depth and detail as desired.

    Individual Petals

    1. For each petal, repeat the creation pattern of Round 2, attaching to flower center as you go.

    Shaping the Petals

    • Gently shape each petal after completing it. To shape, you can use a steam blocker or lightly fill them to achieve curvature.

    Leaves

    1. Create leaves using green yarn in similar fashion, adjusting stitches slightly for a leaf shape.

    Stem

    • If you wish to add a stem, use floral wire covered in yarn, secured to the base of the flower.

    Joining the Pieces

    • Secure petals to the flower center with a slip stitch or sewing. Attach leaves to the base of the flower.

    Assembling the Flower

    1. Position petals evenly around the center. Finish by weaving in all yarn ends.

    Petal Shaping and Finishing Details

    For a beautiful finish, ensure all petals are shaped evenly. You can snip adjustments if petals curl or are uneven, and add decorative details like beads or sequins to the flower center for extra sparkle.

    How to Use Your Crochet Flowers

    • Create a striking handmade bouquet for gifts
    • Use as table centerpieces during the holiday season
    • Attach as a crochet applique on scarves, hats, or bags
    • Add to wreaths and other seasonal decor
    • Craft a beautiful decoration for hair accessories

    Tips for a Better Result

    • Maintain even tension in your stitches for uniformity.
    • Position petals carefully to avoid overlapping.
    • Use light steam to reshape if your petals curl.

    Crochet Flower Customization Ideas

    • Experiment with different yarn colors to create unique looks.
    • Use varying shades for flower layers for added depth.
    • Adjust size by using different weights of yarn or hook sizes.

    Common Problems and Troubleshooting

    • If petals are uneven, check stitch counts to ensure no stitches are skipped.
    • If the flower loses its shape, consider reshaping with a light steam iron.

    Care and Maintenance

    To preserve your crochet poinsettia, hand wash with cool water and lay flat to dry. Avoid harsh chemicals and direct sunlight to maintain color vibrancy.

    Frequently Asked Questions

    • Is this crochet flower pattern beginner-friendly?
      This pattern is better suited for intermediate crocheters due to the petal structure.

    • What yarn is best for crochet flowers?
      Acrylic or cotton yarn works wonderfully for durability and color.

    • How long does it take to crochet this flower?
      Expect to spend about 2-3 hours to complete it.

    • Can I make the flower larger or smaller?
      Yes, using heavier yarn or a larger hook can increase size.

    • How do I keep crochet petals in shape?
      Shape them after completing each, using blocking methods for permanence.

    • Can I use different yarn colors?
      Absolutely! Mix and match colors for a unique floral display.

    • How do I attach a stem to a crochet flower?
      You can securely attach a stem using floral wire at the base.

    • Can I use this crochet flower in a bouquet?
      Yes, they make beautiful additions to any handmade bouquet!

    Conclusion

    Crafting a crochet poinsettia flower is not just about the end result; it’s a way to create warm, lasting memories during the festive season. With their charming design and vibrant colors, these flowers are sure to brighten up your home décor or make a thoughtful handmade gift. Dive into this project and let your crochet skills shine!


    SEO Title: Beautiful Crochet Poinsettia Flower Pattern for Decor
    Meta Description: Learn how to crochet a stunning poinsettia flower for your holiday decor. Perfect for gifts or your home, this free pattern is easy to follow!
    URL Slug: crochet-poinsettia-flower-decor
    Primary Keyword: crochet poinsettia flower
    Secondary Keywords: free crochet flower pattern, crochet flowers, handmade crochet flowers, DIY floral decorations, crochet flower pattern
    Image 1 Alt Text: Finished crochet poinsettia flower decoration
    Image 2 Alt Text: Close-up of crochet poinsettia petals

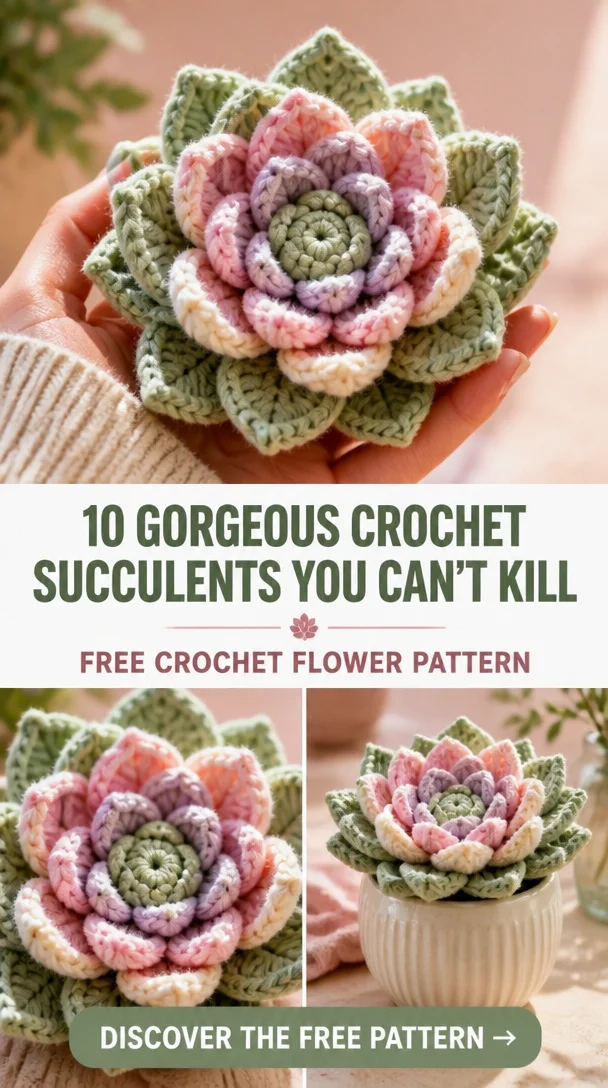
  • 10 Gorgeous Crochet Succulents You Can’t Kill

    10 Gorgeous Crochet Succulents You Can’t Kill

    10 Gorgeous Crochet Succulents You Can’t Kill

    Crocheting is a delightful way to express creativity, and these 10 Gorgeous Crochet Succulents are perfect for anyone looking to add a vibrant touch to their home or gift a unique handmade present. Inspired by the beloved arid plants, these crochet succulents capture the beauty and charm of real succulents while being low-maintenance—just like their living counterparts, they can’t be killed! These delightful creations can be used as standalone decorations, appliques, or even crafted into lovely bouquets for your loved ones. With patterns suitable for both beginners and experienced crafters, you can easily craft these stunning succulents to brighten up your space or to share with friends and family.

    Crochet Flower Pattern Overview

    • Skill Level: Beginner to Intermediate
    • Finished Flower Size: Varies by pattern
    • Crochet Hook Size: H (5mm)
    • Yarn Type: Cotton or Acrylic
    • Yarn Weight: Medium (Worsted)
    • Main Colors: Greens, pinks, and neutrals
    • Petal Construction: Worked in rounds and layered
    • Flower Center Construction: Closed with a unique thread technique
    • Includes Stems/Leaves: Yes, includes optional leaves and stems for some patterns
    • Construction Method: Worked in rounds and separate pieces
    • Approximate Completion Time: 1-3 hours per flower, depending on complexity
    • Beginner-Friendly: Yes, with detailed instructions
    • Worked in Rounds/Rows: Primarily in rounds

    Materials You’ll Need

    • Yarn (in preferred succulent colors)
    • Crochet hook (H size, 5mm)
    • Yarn needle
    • Stitch markers
    • Scissors
    • Floral wire (optional)
    • Stuffing (if specified)
    • Glue (for extra secure attachments, optional)
    • Decorative elements (buttons, beads for flower centers, if desired)

    Crochet Abbreviations

    • MR = magic ring
    • ch = chain
    • sc = single crochet
    • hdc = half double crochet
    • dc = double crochet
    • sl st = slip stitch
    • inc = increase
    • st = stitch
    • sp = space
    • rep = repeat

    Before You Start

    Before diving into your crochet succulent project, take a moment to gather all your materials. Understanding the processes of working in rounds and how many petals you’ll need per design is critical. Maintain an even tension while stitching to ensure a uniform look, and feel free to plan color changes to mimic the aesthetics of real succulents. Prepare separate pieces as instructed, and pay special attention to the assembly to produce perfect flowers.

    Free Crochet Flower Pattern

    Foundation or Magic Ring

    1. Start with a magic ring.
    2. Ch 2 (counts as first dc), then work the requisite stitches according to your specific pattern instructions.

    Flower Center

    1. Crochet a series of dc into the magic ring.
    2. Pull the tail tight to close the ring, securing the flower center.

    First Petal Round

    1. Create petals in the first round, working into stitches around the center.
    2. Follow the specific counts for petals as per the pattern.

    Additional Petal Rounds

    1. Add layers by repeating your petal technique for a fuller flower.
    2. Secure new layers with sl st as necessary.

    Shaping the Petals

    1. Gently shape each petal by using a wet block or gentle steam if needed.
    2. Pin into position until dry, if you can.

    Leaves

    1. If your pattern includes leaves, create them with a similar technique, ensuring they resemble succulent shapes.
    2. Attach securely to the bloom.

    Stem

    1. For optional stems, crochet a long chain or use floral wire for support.
    2. Ensure it is securely attached to the flower’s base.

    Joining the Pieces

    1. Sew any leaves or additional elements to the flower center as required.
    2. Weave in all loose threads for a neat finish.

    Finishing Details

    1. Secure all elements with glue if you want additional durability.
    2. Add decorative elements like beads or buttons as desired.

    Flower Construction and Assembly

    Once all pieces are completed, you can start assembling your crochet succulent. Begin by attaching petals to the flower center securely. If your design includes leaves, position them accordingly to achieve the desired look. For those crochet succulents with stems, make sure the stem is sturdy enough to hold your flower upright. Always remember to check for any ends and secure them snugly.

    Petal Shaping and Finishing Details

    When shaping your petals, focus on creating a symmetrical appearance. This might involve adjusting the angle at which petals are attached. Use decorative edging to enhance the flower’s appeal if your pattern suggests it. Keep flower centers tight and well-positioned, ensuring symmetrical shapes that mimic real succulents.

    How to Use Your Crochet Flowers

    • Handmade flower bouquets
    • Home decoration
    • Table centerpieces
    • Gift decorations
    • Crochet appliques
    • Hair accessories
    • Bag decorations
    • Seasonal decorations
    • Handmade gifts

    Tips for a Better Result

    • Maintain consistent tension for even stitches
    • Keep petals symmetric by counting stitches
    • Avoid twisted petals through careful handling
    • Pay attention while switching colors
    • Secure all pieces carefully to maintain shape

    Crochet Flower Customization Ideas

    • Experiment with different yarn colors
    • Mix contrasting flower centers
    • Try different textures for unique looks
    • Create petal color variations for a stunning effect
    • Arrange flowers for bouquets of varying sizes
    • Use seasonal palettes for holiday decor

    Common Problems and Troubleshooting

    • Uneven petals: Check stitch counts per row
    • Incorrect stitch counts: Count and verify as you work
    • Curling petals: Block your flower to maintain shape
    • Loose stitches: Tweak tension and secure knots firmly
    • Misaligned petal layers: Refer back to assembly instructions
    • Difficulty attaching stems: Ensure the base is sturdy

    Care and Maintenance

    Care for your handmade crochet flowers depends on the yarn used and the manufacturer’s instructions. For delicate petals, consider hand-washing gently and air-drying without distortion. Store carefully to maintain shapes and prevent tangling.

    Frequently Asked Questions

    • Is this crochet flower pattern beginner-friendly?
      Yes, it includes detailed instructions and easy-to-follow steps.

    • What yarn is best for crochet flowers?
      Cotton or acrylic yarn is ideal for structure and durability.

    • How long does it take to crochet this flower?
      Approximately 1-3 hours depending on complexity.

    • Can I make the flower larger or smaller?
      Yes, you can adjust your hook size or yarn weight.

    • How do I keep crochet petals in shape?
      Use blocking techniques or secure with glue where needed.

    • Can I use different yarn colors?
      Absolutely! Different color combinations can create unique looks.

    • How do I attach a stem to a crochet flower?
      Securely stitch or glue the stem where indicated in the pattern.

    • Can I use this crochet flower in a bouquet?
      Yes, they make lovely additions to any floral arrangement.

    Conclusion

    Creating these gorgeous crochet succulents is not only a fun and fulfilling project but also a fantastic way to add a needlework flair to your space. Whether you choose to display them individually or arrange them into an elaborate bouquet, these charming succulents will surely bring joy to anyone who receives one. Now, grab your materials and start crocheting these lovely projects today!


    SEO Title: 10 Gorgeous Crochet Succulents You Can’t Kill – Easy Patterns
    Meta Description: Discover 10 easy crochet succulent patterns that brighten your home. Perfect for gifts and decor, these durable handmade flowers can’t be killed!
    URL Slug: crochet-succulents
    Primary Keyword: crochet succulents
    Secondary Keywords: crochet flower pattern, easy crochet flower, handmade crochet flowers, DIY crochet flowers, crochet flower tutorial
    Image 1 Alt Text: A vibrant collection of crochet succulents in various colors and shapes.
    Image 2 Alt Text: Close-up of a beautifully crafted crocheted succulent flower with leaf details.

Easy Crochet Flower

Your free crochet ebook

Leave your email address to request your free crochet ebook.

Your email address will be used to handle your ebook request.